SDK の生成
FastAPI は OpenAPI 仕様に基づいているため、その API は多くのツールが理解する標準形式で記述できます。
これにより、最新のドキュメント、複数の言語でのクライアントライブラリ (SDK)、およびコードと同期を保つテストまたは自動化ワークフローを簡単に生成できます。
このガイドでは、FastAPI バックエンド用の TypeScript SDK を生成する方法を学びます。
オープンソース SDK ジェネレーター
汎用的な選択肢は、多くのプログラミング言語をサポートし、OpenAPI 仕様から SDK を生成できるOpenAPI Generatorです。
TypeScript クライアントの場合、Hey API は、TypeScript エコシステムに最適化されたエクスペリエンスを提供する専用のソリューションです。
OpenAPI.Toolsでさらに多くの SDK ジェネレーターを見つけることができます。
ヒント
FastAPI は自動的に OpenAPI 3.1 仕様を生成するため、使用するツールはこのバージョンをサポートしている必要があります。
FastAPI スポンサーからの SDK ジェネレーター
このセクションでは、FastAPI を後援している企業が提供する、ベンチャーキャピタル支援および企業支援ソリューションを紹介します。これらの製品は、高品質な生成済み SDK に加えて、追加機能と統合を提供します。
✨ FastAPI を後援する ✨ ことで、これらの企業は、フレームワークとそのエコシステムが健全で持続可能であることを保証するのに役立ちます。
彼らのスポンサーシップは、FastAPI コミュニティ (あなた) への強いコミットメントも示しており、優れたサービスを提供するだけでなく、堅牢で繁栄するフレームワークである FastAPI をサポートすることにも関心があることを示しています。🙇
たとえば、以下を試してみることをお勧めします。
これらのソリューションの中には、オープンソースであるか、無料枠を提供しているものもあるため、金銭的な負担なしに試すことができます。他の商用 SDK ジェネレーターも利用可能で、オンラインで見つけることができます。🤓
TypeScript SDK の作成
簡単な FastAPI アプリケーションから始めましょう
from fastapi import FastAPI
from pydantic import BaseModel

app = FastAPI()


class Item(BaseModel):
    name: str
    price: float


class ResponseMessage(BaseModel):
    message: str


@app.post("/items/", response_model=ResponseMessage)
async def create_item(item: Item):
    return {"message": "item received"}


@app.get("/items/", response_model=list[Item])
async def get_items():
    return [
        {"name": "Plumbus", "price": 3},
        {"name": "Portal Gun", "price": 9001},
    ]
🤓 その他のバージョンとバリアント
from typing import List

from fastapi import FastAPI
from pydantic import BaseModel

app = FastAPI()


class Item(BaseModel):
    name: str
    price: float


class ResponseMessage(BaseModel):
    message: str


@app.post("/items/", response_model=ResponseMessage)
async def create_item(item: Item):
    return {"message": "item received"}


@app.get("/items/", response_model=List[Item])
async def get_items():
    return [
        {"name": "Plumbus", "price": 3},
        {"name": "Portal Gun", "price": 9001},
    ]
注意すべきは、*パス操作*が、リクエストペイロードとレスポンスペイロードに使用するモデルを、`Item` および `ResponseMessage` モデルを使用して定義している点です。
API ドキュメント
/docs にアクセスすると、リクエストで送信され、レスポンスで受信されるデータのスキーマが表示されます。
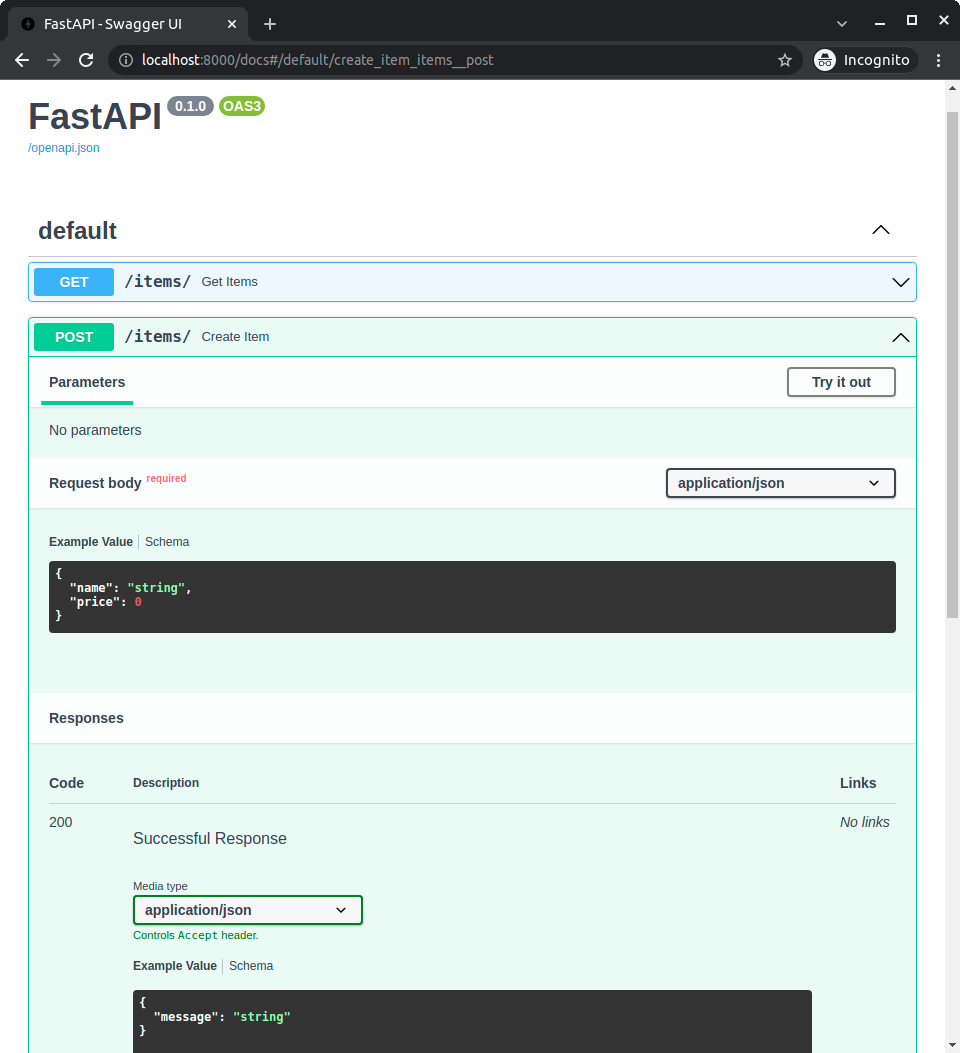
これらのスキーマは、アプリ内のモデルで宣言されているため、表示されます。
その情報はアプリの OpenAPI スキーマで利用可能であり、その後 API ドキュメントに表示されます。
OpenAPI に含まれるモデルからの同じ情報は、クライアントコードを生成するために使用できます。
Hey API
モデルを持つ FastAPI アプリケーションができたら、Hey API を使用して TypeScript クライアントを生成できます。これを行う最も簡単な方法は npx を介することです。
npx @hey-api/openapi-ts -i https://:8000/openapi.json -o src/client
これにより、TypeScript SDK が ./src/client に生成されます。
@hey-api/openapi-ts のインストール方法と、Web サイトで生成される出力について読むことができます。
SDK の使用
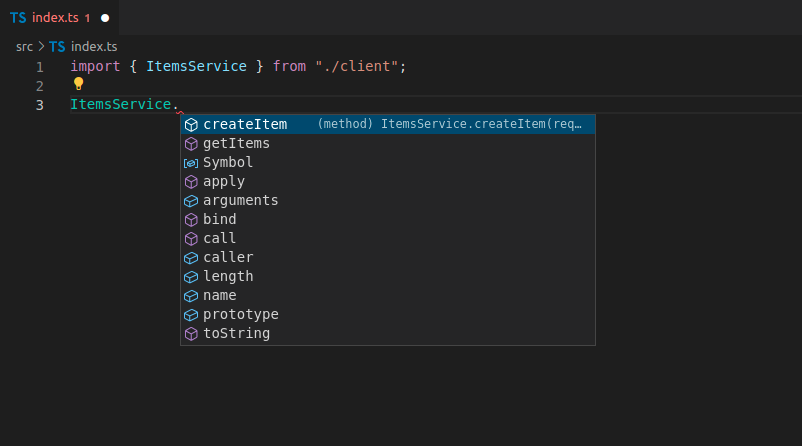
これでクライアントコードをインポートして使用できます。以下に示すように、メソッドの自動補完が利用できます。

送信するペイロードについても自動補完機能が利用できます
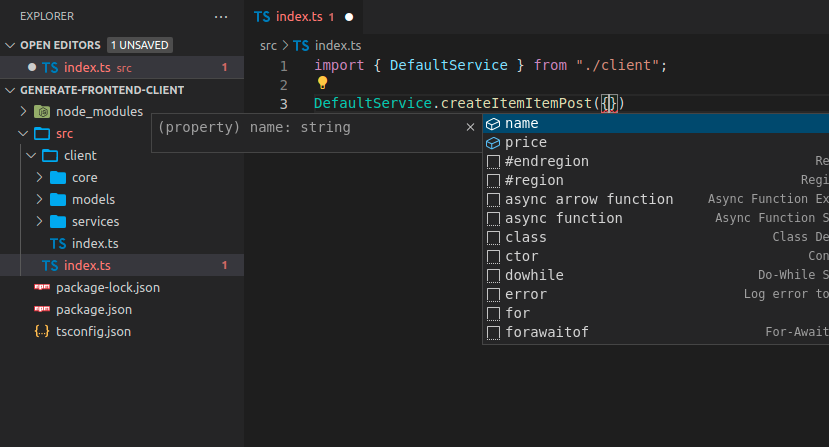
ヒント
FastAPI アプリケーションの `Item` モデルで定義された `name` と `price` のオートコンプリートに注目してください。
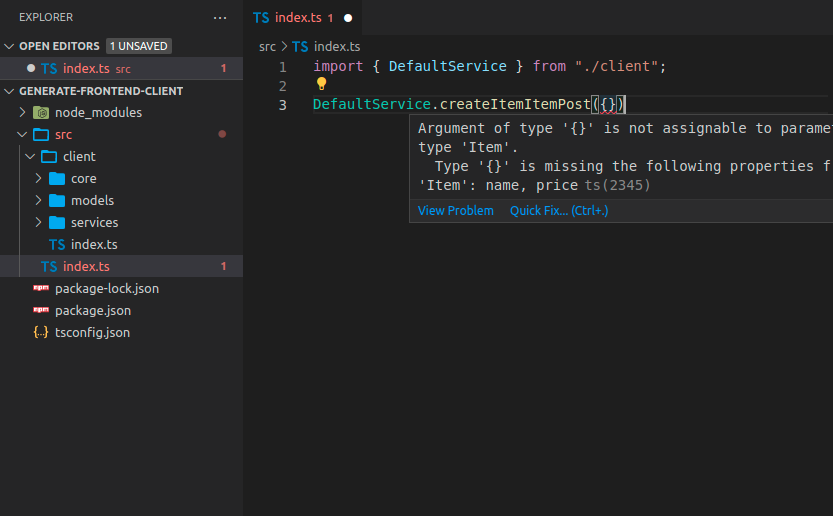
送信するデータにインラインエラーが表示されます
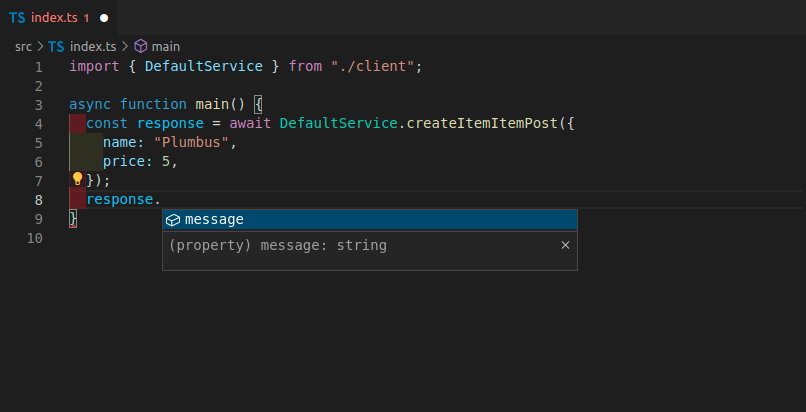
レスポンスオブジェクトも自動補完されます。
タグ付き FastAPI アプリ
多くの場合、FastAPI アプリはより大きくなり、*パス操作*の異なるグループを分離するためにタグを使用するでしょう。
たとえば、**アイテム**のセクションと**ユーザー**のセクションがあり、それらはタグで区切ることができます。
from fastapi import FastAPI
from pydantic import BaseModel

app = FastAPI()


class Item(BaseModel):
    name: str
    price: float


class ResponseMessage(BaseModel):
    message: str


class User(BaseModel):
    username: str
    email: str


@app.post("/items/", response_model=ResponseMessage, tags=["items"])
async def create_item(item: Item):
    return {"message": "Item received"}


@app.get("/items/", response_model=list[Item], tags=["items"])
async def get_items():
    return [
        {"name": "Plumbus", "price": 3},
        {"name": "Portal Gun", "price": 9001},
    ]


@app.post("/users/", response_model=ResponseMessage, tags=["users"])
async def create_user(user: User):
    return {"message": "User received"}
🤓 その他のバージョンとバリアント
from typing import List

from fastapi import FastAPI
from pydantic import BaseModel

app = FastAPI()


class Item(BaseModel):
    name: str
    price: float


class ResponseMessage(BaseModel):
    message: str


class User(BaseModel):
    username: str
    email: str


@app.post("/items/", response_model=ResponseMessage, tags=["items"])
async def create_item(item: Item):
    return {"message": "Item received"}


@app.get("/items/", response_model=List[Item], tags=["items"])
async def get_items():
    return [
        {"name": "Plumbus", "price": 3},
        {"name": "Portal Gun", "price": 9001},
    ]


@app.post("/users/", response_model=ResponseMessage, tags=["users"])
async def create_user(user: User):
    return {"message": "User received"}
タグ付き TypeScript クライアントの生成
タグを使用する FastAPI アプリケーションのクライアントを生成すると、通常、クライアントコードもタグに基づいて分離されます。
これにより、クライアントコードが正しく整理され、グループ化されます。
この場合、あなたは持っています
ItemsServiceUsersService
クライアントメソッド名
現在のところ、`createItemItemsPost` のような生成されたメソッド名はあまりきれいに見えません。
ItemsService.createItemItemsPost({name: "Plumbus", price: 5})
...これは、クライアントジェネレーターが各*パス操作*に対して OpenAPI 内部の**操作 ID** を使用しているためです。
OpenAPI は、すべての*パス操作*で各操作 ID が一意であることを要求するため、FastAPI は、操作 ID が一意であることを確認できるように、**関数名**、**パス**、および**HTTP メソッド/操作**を使用してその操作 ID を生成します。
しかし、次にそれを改善する方法をお見せします。🤓
カスタム操作 ID とより良いメソッド名
これらの操作 ID の**生成方法**を**変更**して、よりシンプルにし、クライアントで**よりシンプルなメソッド名**を持つことができます。
この場合、各操作 ID が他の方法で一意であることを確認する必要があります。
たとえば、各 *パス操作* にタグがあることを確認し、**タグ**と *パス操作* **名** (関数名) に基づいて操作 ID を生成することができます。
カスタム一意 ID 生成関数
FastAPI は、各*パス操作*に**一意の ID** を使用します。これは、**操作 ID** と、リクエストまたはレスポンスに必要なカスタムモデルの名前にも使用されます。
この関数をカスタマイズできます。`APIRoute` を引数にとり、文字列を出力します。
たとえば、ここでは最初のタグ(おそらくタグは1つだけでしょう)とパス操作名(関数名)を使用しています。
そのカスタム関数を generate_unique_id_function パラメーターとして FastAPI に渡すことができます
from fastapi import FastAPI
from fastapi.routing import APIRoute
from pydantic import BaseModel


def custom_generate_unique_id(route: APIRoute):
    return f"{route.tags[0]}-{route.name}"


app = FastAPI(generate_unique_id_function=custom_generate_unique_id)


class Item(BaseModel):
    name: str
    price: float


class ResponseMessage(BaseModel):
    message: str


class User(BaseModel):
    username: str
    email: str


@app.post("/items/", response_model=ResponseMessage, tags=["items"])
async def create_item(item: Item):
    return {"message": "Item received"}


@app.get("/items/", response_model=list[Item], tags=["items"])
async def get_items():
    return [
        {"name": "Plumbus", "price": 3},
        {"name": "Portal Gun", "price": 9001},
    ]


@app.post("/users/", response_model=ResponseMessage, tags=["users"])
async def create_user(user: User):
    return {"message": "User received"}
🤓 その他のバージョンとバリアント
from typing import List

from fastapi import FastAPI
from fastapi.routing import APIRoute
from pydantic import BaseModel


def custom_generate_unique_id(route: APIRoute):
    return f"{route.tags[0]}-{route.name}"


app = FastAPI(generate_unique_id_function=custom_generate_unique_id)


class Item(BaseModel):
    name: str
    price: float


class ResponseMessage(BaseModel):
    message: str


class User(BaseModel):
    username: str
    email: str


@app.post("/items/", response_model=ResponseMessage, tags=["items"])
async def create_item(item: Item):
    return {"message": "Item received"}


@app.get("/items/", response_model=List[Item], tags=["items"])
async def get_items():
    return [
        {"name": "Plumbus", "price": 3},
        {"name": "Portal Gun", "price": 9001},
    ]


@app.post("/users/", response_model=ResponseMessage, tags=["users"])
async def create_user(user: User):
    return {"message": "User received"}
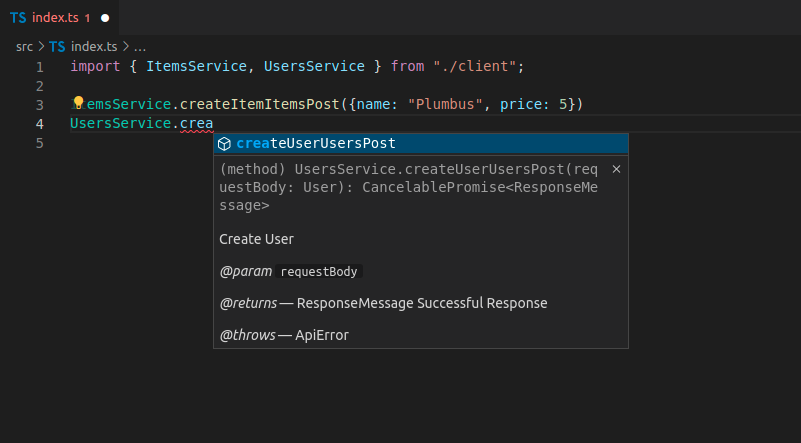
カスタム操作 ID を持つ TypeScript クライアントの生成
これで、クライアントを再度生成すると、改善されたメソッド名が表示されます。

ご覧のとおり、メソッド名にはタグと関数名が含まれるようになりました。URL パスと HTTP 操作からの情報は含まれません。
クライアントジェネレーター用の OpenAPI 仕様を前処理する
生成されたコードには、まだいくつかの重複情報があります。
このメソッドが**アイテム**に関連していることは、ItemsService (タグから取得) にその単語が含まれているため、すでにわかっていますが、メソッド名にもタグ名がプレフィックスとして付いています。😕
OpenAPI 全体としては、操作 ID が一意であることを保証するために、引き続き保持したいと考えるでしょう。
しかし、生成されるクライアントの場合、クライアントを生成する直前に OpenAPI の操作 ID を**変更**して、メソッド名をより見栄えが良く、**クリーン**にすることができます。
OpenAPI JSON を `openapi.json` ファイルにダウンロードし、次のようなスクリプトでそのプレフィックス付きタグを削除することができます。
import json
from pathlib import Path

file_path = Path("./openapi.json")
openapi_content = json.loads(file_path.read_text())

for path_data in openapi_content["paths"].values():
    for operation in path_data.values():
        tag = operation["tags"][0]
        operation_id = operation["operationId"]
        to_remove = f"{tag}-"
        new_operation_id = operation_id[len(to_remove) :]
        operation["operationId"] = new_operation_id

file_path.write_text(json.dumps(openapi_content))
import * as fs from 'fs'

async function modifyOpenAPIFile(filePath) {
  try {
    const data = await fs.promises.readFile(filePath)
    const openapiContent = JSON.parse(data)

    const paths = openapiContent.paths
    for (const pathKey of Object.keys(paths)) {
      const pathData = paths[pathKey]
      for (const method of Object.keys(pathData)) {
        const operation = pathData[method]
        if (operation.tags && operation.tags.length > 0) {
          const tag = operation.tags[0]
          const operationId = operation.operationId
          const toRemove = `${tag}-`
          if (operationId.startsWith(toRemove)) {
            const newOperationId = operationId.substring(toRemove.length)
            operation.operationId = newOperationId
          }
        }
      }
    }

    await fs.promises.writeFile(
      filePath,
      JSON.stringify(openapiContent, null, 2),
    )
    console.log('File successfully modified')
  } catch (err) {
    console.error('Error:', err)
  }
}

const filePath = './openapi.json'
modifyOpenAPIFile(filePath)
これにより、操作 ID は items-get_items のようなものから単に get_items に変更され、クライアントジェネレーターはよりシンプルなメソッド名を生成できます。
前処理された OpenAPI を使用して TypeScript クライアントを生成する
最終結果が `openapi.json` ファイルにあるため、入力場所を更新する必要があります。
npx @hey-api/openapi-ts -i ./openapi.json -o src/client
新しいクライアントを生成すると、すべての自動補完、インラインエラーなどを含む、クリーンなメソッド名が生成されます。
利点
自動生成されたクライアントを使用すると、次のような**自動補完**機能を利用できます。
- メソッド。
- ボディ、クエリパラメーターなどのリクエストペイロード。
- レスポンスペイロード。
また、すべてにインラインエラーも表示されます。
そして、バックエンドコードを更新し、フロントエンドを**再生成**するたびに、新しい*パス操作*がメソッドとして利用可能になり、古いものは削除され、その他の変更は生成されたコードに反映されます。🤓
これは、何かが変更された場合、それがクライアントコードに自動的に**反映される**ことも意味します。そして、クライアントを**ビルド**すると、使用されたデータに**不一致**がある場合はエラーになります。
したがって、開発サイクルのごく初期段階で多くのエラーを検出でき、本番環境で最終ユーザーにエラーが発生するのを待ってから問題のデバッグを試みる必要がなくなります。✨